News
-
 Pranayama workshop, Mar 1-7
-
 21-day Pranayama challenge
-
 Nāda meditation workshop, January 8-12
-
 April 3, Navaratri with Yogi Matsyendranath Maharaj, Australia, Queensland
-
 March 17, 2020. Purifiying Pranayama With Yogi Matsyendra Nath
-
 November 2019, Tantra Workshop Series in Argentina
-
 Workshop in Gualeguaychu
-
") 17-18 November 2018, Yogi Matsyendranath in Źarate (Argentina)
17-18 November 2018, Yogi Matsyendranath in Źarate (Argentina)
-
 15-16 November 2018, Yogi Matsyendranath visit to Uruguay
-
") 12 Nov 2018, Lecture at USAL (Salvador University)
12 Nov 2018, Lecture at USAL (Salvador University)
-
") 10-11 November 2018, Workshops in Quilmes and La Plata (Argentina)
10-11 November 2018, Workshops in Quilmes and La Plata (Argentina)
-
") 8 November 2018, Open conference in Necochea (Argentina)
8 November 2018, Open conference in Necochea (Argentina)
-
 2,3,4 November 2018 - Participating in XVI Retreat International of Yoga and Meditation
-
 13-16 June") Programme in Québec (Canada) 13-16 June
Programme in Québec (Canada) 13-16 June
-
 Melbourne Book Launch
-
 4-years Summer Program
-
 Biography of a Russian Yogi
-
 November 2017, Visit of Yogi Matsyendranath to Argentina
-
 Satsangs of Yogi Matsyendranatha Maharaj in Berlin
-
") Seminars and trainings in June-July 2015 (France)
Seminars and trainings in June-July 2015 (France)
Asana set #3
1. Dandasana
 Initial position: sitting up straight.
Straighten your legs, pull your toes on, tighten kneecaps, heels of straight legs should be slightly pushed forward; the crown should be straightened up. Keep the feeling of the uniform tension along the spine. Feel the slight tone of the hips, body and back; the shoulders are relaxed. The muscles of the face and eyes, as well as breathing, should also be relaxed.
Effect: the deep muscles of the body and legs are worked out; the muscles along the spine are working as well; the posture is formed.
2. Staff pose with right leg up
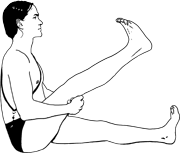 Initial position: Dandasana.
Keep, if possible, the initial position of the body and legs, bend the left leg at the knee, bringing the shin of the bent leg towards the body. Check the position of the body and back, straighten the spine. Then, gradually push the heel of the bent leg upward and forward, straightening the leg in the way as to retain the shortest distance (if possible) between the shin and body. If, during the straightening of the leg at the knee, the shin is removed from the body too far away, initially straighten your leg, slightly controlling the tone of the shin muscles in the position that can be achieved without stooping or moving the shin away from the body. Remain in this position for a few breaths and return to the initial position.
Effect: the deep muscles of the body and legs are working, as well as those along the spine, forming good posture. The bottom surfaces of the legs and lumbar muscles are stretched. The organs of the abdominal and pelvic cavities are massaged.
3. Parsva Natarajasana
 Initial position: Dandasana.
Effect: the muscles along the spine are stretched; the shoulders are expanded; the deep muscles of the anterior surface of the body and the shins’ upper surfaces are strengthened. Hip joints are expanded.
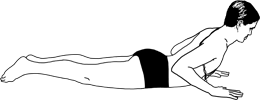
4. Pranamasana
 Initial position: standing on the knees and palms. Hips and straight hands are perpendicular to the floor.
Retain the hips in the initial position, straighten the palms of straight hands forward; thus, in the final position, the body and hands should form a straight line. The neck should continue the spine line. The spine should be extended in the direction of the pelvis. The face and breathing should be relaxed. The forehead is on the mat.
Effect: the shoulders are expanded and the spine is stretched.
5. Ardha Shalabhasana
 Initial position: lie down on your abdomen, face down. The forehead and nose should be touching the floor; the arms should be stretched along the body; the palms should be facing down and pressed against the floor.
Take a breath and, on an exhalation, set the hands against the floor, lift your left leg, stretching the shin back and to the top, thus, forming slight tension of the lumbus subsequent to the hip. Gently pulling the chin, straighten the upper surface of the neck forward.
Gradually, add a little tension in the thoracic section of the spine subsequent to the neck. Try not to bend the legs at the knees. The shin of the supporting leg should be in a relaxed position. Remain in the final position for a few breaths. Attention should be concentrated in the lumbar section, the sacrum and the inner surfaces of the hips. Smoothly return the shin to the initial position. Relax the muscles and breathing and repeat the same in the opposite direction.
Effect: the asana affects the abdominal organs; relieves constipation; improves the functions of the bowel, liver, kidney, spleen; it also helps with lumbosacral radiculitis, as well as neuralgia of the sciatic nerve.
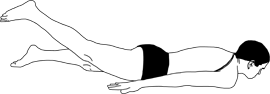
6. Bhujangasana
 Initial position: lying on the abdomen. Legs are straight, toes rest on the floor. The palms of the hands are on the floor at shoulders’ level.
Slowly breathing in and tightening the chin, lift the head above the floor and gently pull the upper part of the neck forward and to the top. Then, slowly raise the shoulders and chest, stretching the spine. The palms are slightly pressed against the floor, rather giving confidence than the real support while bending. The focus should be on the work of the back muscles. The position should be fixed in the state of final tension for some time, until the feeling of discomfort appears, while maintaining calm and steady breathing. Then, slowly exhale and successively lower the chest, neck and head; return to the initial position. Initially, the attention should be focused on the neck; and then, as the body is lifting, on the spine and lumbar muscles. It is advisable to leave the hips relaxed throughout the performance of the asana. Repeat, if desired.
Effect: in this position, the spine is stretched in the cervical and thoracic sections; the muscles in the lumbar region and sacrum area are strengthened. The entire spinal section is in tone. The tension and stiffness in the neck and back area are eliminated. The pressure on the abdominal wall affects the internal organs and optimizes the digestive system’s functioning; it also stimulates the appetite.
7. Urdhva Prasarita Padasana (a)
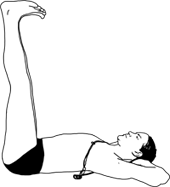 Initial position: lying on the back.
Cross the fingers of the hands of the bent arms that are placed under the back of the head. Elbows are drawn aside and pressed against the floor, if possible. Bend your legs at the knees, pressing the lumbus against the floor. While straightening the legs, push the heels straight up so that the angle between the torso and hips is approximately 90 degrees. The knee caps should be tightened. If discomfort appears under the knees or in the lumbus, the legs could be slightly bent at the knees. Remain in this position for a few breaths.
Effect: the deep muscles of the hips are developed; the pelvic and the muscles of the lumbus are working. The back muscles are strengthened. The functions of the pelvic and abdominal cavity organs are optimized.
7. Urdhva Prasarita Padasana (b)
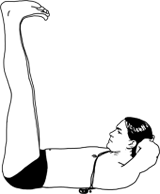 Initial position: urdkhva prasarita padasana (a).
On an exhalation, lift the head and pull the crown up, together with the lock and elbows drawn to the sides. The lock with the elbows drawn to the sides should also be lifted. Attention is focused on the pelvis and the feeling of the functioning muscles of the neck and the thoracic spine is maintained. Remain in this position for a few breaths. On an inhalation, return to the initial position; on an exhalation, lower the legs.
Effect: the same as in urdkhva prasarita padasana (a). Additionally, the neck and chest areas are working.
8. Pawanmuktasana
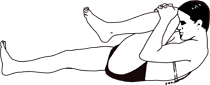 Initial position: lying on the back, relax the muscles and breathing.
Bend the left leg, take it to the lock. Tighten the hip and the knee to the body, while maintaining a common relaxed background and relaxing the muscles of the waist and hips of the bent leg; thus, eventually you can pull up the hip to the torso with a minimum muscle tension. The second leg should remain straight; the heel of the straight leg should be pulled forward, trying to move the thigh to the floor. Relax and remain in that position; thus, the straight leg, the back and the head are on the floor.
Smoothly inhale while lifting your head and shoulders; thus, the forehead, nose and chin should be touching the left knee or be as close as possible to it at the end of the inhalation. Remain in this position for several cycles of even breathing. Then, slowly exhale, lowering the head and shoulders onto the floor, to the initial position. Relax a little and do the same with the other leg. Then, pull up both bent legs to the chest, fixing them in this position for a few breaths. Relax.
Effect: the asana massages the abdominal organs. It increases blood circulation and stimulates the nerves associated with the functioning of the abdominal organs. This asana is particularly useful in relieving constipation and flatulence. In addition, pawanmuktasana tones the muscles and nerves of the back, which also has a positive effect on the internal organs and systems.
9. Ardha Parivrita Nakrasana
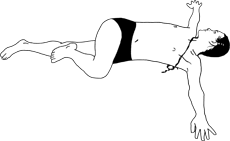 Initial position: lying on the back, the body is relaxed.
Move the palms of straight hands to the sides, turn palms down and press them to the floor. While bending the left leg at the knee, press the foot of the bent leg against the middle of the hip of the opposite one. Retain the shoulders pressed to the floor, reverse the pelvis and hip of the bent leg to the right, including the muscles of the abdomen and the inner surface of the bent leg. Initially, the pelvis and hip may not be turned completely; it is important to continue to keep the attention on the hips and pelvic muscles. Gradually, while increasing the control over the muscles, their activity will reverse the pelvis and the hip while keeping the knee of the bent leg pressed against the floor.. Remain in the extreme position for a few breaths. Return the pelvis and the hip to the initial position. Relax. Repeat the same in the opposite direction.
Effect: the same as in pavanmuktasane. The lumbus and sacrum are additionally worked out; the shoulder girdle is expanded.
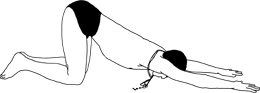
10. Adho Mukha Svanasana
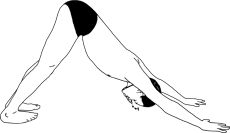 Initial position: standing on the knees, the palms of straight hands are pressed against the floor.
Place the feet approximately at the pelvis width apart. Pushing away from the floor with the hands and feet, push your lumbus back and upwards, slightly stretching the spine towards the pelvis. The palms are firmly pressed against the floor. The toes of straight legs should be slightly pulled up; the heels should be pulled down. The distance between the palms is approximately the shoulder length. Watch closely your feelings of the tone of the front surface of the hips and abdominal wall muscles, as well as your feelings in the pelvic area.
Make sure your palms are rested on their entire surfaces, and not just on the wrists, as not to overload them. Torso and legs' lines shall form an angle, which is maintained due to the steady activity of the muscles of the torso, hips and pelvis. The neck and face are relaxed. Gradually, when the activity of the torso and legs muscles becomes stable, shoulders are expanded and arranged in one line with the torso. Otherwise, you may slightly bend your knees to relieve the extra load on the shoulders. Gradually, as the hamstrings are stretched and shoulders are expanded, the body takes its final position.. At the beginning of learning the asana, perform it in the form in which it you can do it, trying to stay in it for several breath cycles.
Effect: the muscles of the torso and legs are worked out; the pelvis and hip joints get involved; the shoulders are expanded; the hamstrings are stretched and the ankle joints are worked out.
11. Ardha Matsyendrāsana
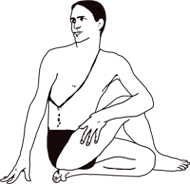 Initial position: sitting on the floor with straight legs and straight back
While bending the right leg at the knee, put its foot under the pelvis with a sole turned upwards. Sit down on the foot so that the heel ends up under the right seat bone and the toe ends up under the left one. Bend the left leg at the knee, transfer it over the knee of the right leg and press the foot against the floor. Straighten the spine and expand the shoulders into the horizontal position. At the same time, grab the left knee and hip with the right hand, pressing the hip to the torso. The left hand is straight, is wrist is on the floor. Turn the torso to the left, around its axis, while maintaining the balance and a vertical position of the spine. The head, neck and eyes are turned in the direction of rotation, the sight is fixed on the extreme position, in which we try to relax the muscles around the eyes as much as it is possible in this retracted state. Try to keep the pelvis in a vertical position as well, in line with the torso, and without tumbling it down backwards and to the sides.
The torso and the spine should be striving at simultaneously stretched themselves upwards and rotating around their axes, which reduces the weight of the pelvis on the supporting foot. Expand the shoulders and relax them at the same time. Use the hands to support the tension and rotation along the spine to a minimum, thereby increasing the efficiency of the body and spine muscles, involved in the exercise. Remain in this position for a few breaths. Return to the initial position. Switch sides and repeat.
Effect: this asana affects the spine along its whole length, facilitating its stretching and twisting. It also has an impact on the abdominal and pelvic areas.
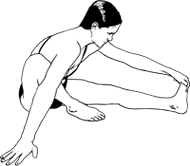
12. Yoga Mudra in Sukkhasana
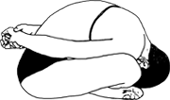 Initial position: Sukkhasana, the position with crossed heels.
While straightening your back, keep a slight tension along the spine. Take the first finger of the left hand into the fist; grab the wrist of the left hand with the right one behind the back. Lower the torso onto the hips and the forehead or the crown of the head -- onto the floor. The hand lock should be placed in a relaxed state on the lower back. Relax the body, hips, face and breathing. Remain in this position for 5-7 even breaths and return the torso to the initial position. Change the position of the legs. Repeat the same in the opposite direction.
Effect: the lock behind the back closes up the inner space. Turning the attention and energy inwards, this asana contributes to pratyahara.The lumbar spine is worked out; the sacral spine, hips and hip joints are loosened up. The pressure off the thoracic spine and the nape is relieved. It also promotes mental and emotional relaxation.