News
-
 Pranayama workshop, Mar 1-7
-
 21-day Pranayama challenge
-
 Nāda meditation workshop, January 8-12
-
 April 3, Navaratri with Yogi Matsyendranath Maharaj, Australia, Queensland
-
 March 17, 2020. Purifiying Pranayama With Yogi Matsyendra Nath
-
 November 2019, Tantra Workshop Series in Argentina
-
 Workshop in Gualeguaychu
-
") 17-18 November 2018, Yogi Matsyendranath in Źarate (Argentina)
17-18 November 2018, Yogi Matsyendranath in Źarate (Argentina)
-
 15-16 November 2018, Yogi Matsyendranath visit to Uruguay
-
") 12 Nov 2018, Lecture at USAL (Salvador University)
12 Nov 2018, Lecture at USAL (Salvador University)
-
") 10-11 November 2018, Workshops in Quilmes and La Plata (Argentina)
10-11 November 2018, Workshops in Quilmes and La Plata (Argentina)
-
") 8 November 2018, Open conference in Necochea (Argentina)
8 November 2018, Open conference in Necochea (Argentina)
-
 2,3,4 November 2018 - Participating in XVI Retreat International of Yoga and Meditation
-
 13-16 June") Programme in Québec (Canada) 13-16 June
Programme in Québec (Canada) 13-16 June
-
 Melbourne Book Launch
-
 4-years Summer Program
-
 Biography of a Russian Yogi
-
 November 2017, Visit of Yogi Matsyendranath to Argentina
-
 Satsangs of Yogi Matsyendranatha Maharaj in Berlin
-
") Seminars and trainings in June-July 2015 (France)
Seminars and trainings in June-July 2015 (France)
Asana set #4
1. Pranama Kriya in Vajrasana

Initial position: Vajrasana.
Inhale, extend the palms of straight hands upwards, distributing the stretch evenly along the spine and straight arms evenly in the direction of the palms. If possible, maintain the straight tension line along the spine and arms and exhale slowly, turning the pelvis in the pelvis joints, and, without disconnecting the hips from the heels, lower the torso forward and down, until the palms are touching the floor. In case it is difficult to exhale smoothly, you may first release your breath and not hold it. Relax the muscles of the back, hands and legs, so that gradually, while relaxing, the torso is lowered onto the hips, the pelvis – onto the heels, but the elbows and forearms – onto the floor. Relax the face, eyes and breathing. Then, while straightening your arms in the elbows and tensing the back muscles, inhale and first try to lift the palms off the floor. Then turn the pelvis and the straight line of the back and arms upwards until the spine reaches the vertical position. Exhale, lower the palms while relaxing the shoulders, elbows and hips; the spine remains slightly stretched throughout its length. In the beginning, you do not have to hold the breath when lifting the torso and hands, but try to maintain the smoothness your movement.
Effect: the muscles along the spine, as well as the shoulder and hip muscles are activated; the hip joints are worked out. Slouching is eliminated.
2. Marjariasana with “one side” hand and leg stretch
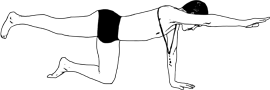 Initial position: standing on knees and straight arms, palms under the shoulders, arms and hips are perpendicular to the floor; the palms are placed firmly on the floor, from fingertips to wrists.
Inhale, stretch the straight left leg back, while stretching the left palm, shoulder and the back and top of the head forward. Draw the chin slightly towards the chest, but do not lower your head and the neck should continue the line of the spine. Look down at the floor, without lowering your head and fixing your eyes on any immobile point on the floor. The pelvis remains closed, do not lift it. Form the feeling of even tension along the spine line, stretching it between the hip and the shoulder blade. Exhale and lower the palm and the knee.
Effect: the asana helps to form the stretch of the spine and the balance; the muscles of the hips, shoulders and spine are worked out; slouching is eliminated.
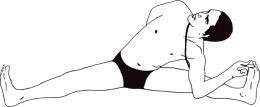
3. Parsva Upavistha Konasana (a)
 Initial position: sitting with your back straight, the heels of straight legs are turned to the sides. If the body leans back and the back is slouching, you may slightly bend your knees.
Effect: the spine and side surfaces of the torso are stretched; the pelvic muscles and those of the lower part of the body, as well as the deep muscles of the hips are worked out; the surfaces of the lower legs are stretched; the slight turn and opening of the pelvis in the pelvic joints takes place. The lower back and the tailbone section of the spine are relaxed.
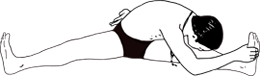
3. Parsva Upavistha Konasana (b)
 Initial position: sitting with your back straight, the heels of straight legs are brought to the sides. If the body leans back and the back slouches, you may bend the knees slightly.
Effect: the asana stretches the lateral surface of the body and neck, as well as the lower leg surfaces. The shoulders get opened.
4. Janu Sirsasana
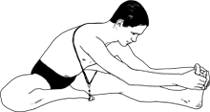 Initial position: sitting on the floor, legs are straight.
Bend the left knee, pulling up the heel towards the perineum, but the foot is facing the hip of the straight leg. Inhale, raise straight hands and torso, stretching the spine and turning the body into the plane of the straight leg. Exhale, try to push the pelvis forward and down, bending the torso forward and stretching the shoulders, shoulder blades and elbows forward and down. Take the shin or foot with both palms (depending on the initial flexibility). Inhale, stretch the back of the head forward and up, straighten the back.
The chin stays in the initial position; do not throw your head back. If you are successful with the previous position and the lower back is stretched, you can lean lower when exhaling, turning the pelvis a bit more, bringing the abdomen closer to the hip and the top of the head closer to the toe. It is important that shoulder joints and elbows are at the same distance from the floor and side surfaces of the torso and palms are placed symmetrically. The upper part of the hip of the straight leg should be toned slightly, while pulling up the kneecap. If the torso is far from the hip, slightly bend the straight leg, tightening the muscles of the abdomen and perineum. Hold the foot of the right leg vertically, perpendicular to the floor. Stay in the asana for a few breaths. Inhale and return to the starting position.
Repeat symmetrically in the opposite direction. Try to avoid excessive stretching of the side of the body, which has better flexibility; otherwise, in case of the original asymmetry of the body it may make it worse. It is essential that both sides of the body are developed equally. If the bend forward causes discomfort in the knee of the bent leg, the straight leg should be slightly bent as well. Stay in the asana for as long as you are comfortable.
Effect: due to influence on the abdominal and lower back areas, janu sirsasana has a positive effect on the functions of the digestive system and kidneys. Congestion in the pelvic area is reduced. Hip joints open. The spine loosens up; the shoulder-girdle is worked out; the side surfaces of the torso and hamstring areas get stretched.
5. Makarasana
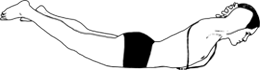 Initial position: lying flat on the abdomen.
Bend your elbows, lock your fingers on the back of the head. Move your elbows sidewards and slightly raise them above the ground; opening the shoulders. Inhale smoothly and with the exhale raise the upper part of the body, leaving the lower ribs on the floor. The back of the head pulls the spine forward and up, the chin is slightly pulled up; try not to throw back your head. This involves the muscles of the neck and thoracic spine to a maximum. Stretch the hips of the straight legs back and up. In the final position, keep the body in the air without holding the breath and controlling the feeling of the back and neck muscles being at work. The face and eyes muscles should stay relaxed if possible. Stay in the asana for a few breath cycles. Return to the starting position.
Effect: the asana is helpful in cases of extremely elastic ligaments along the spine, to people prone to the vertebrae displacement, as well as to the diseases of the upper respiratory tract.
6. Ardha mayurasana
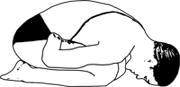 Initial position: vajrasana.
Fist your hands. The side surfaces of the palms are pressed against the base of the hips closer to the groin, the elbows are moved slightly to the sides. As a result, your bent little fingers end up closer to the fold between the torso and hips, and the thumbs end up further away. Inhale and on the exhale, while leaving the pelvis on the heels, bend the body and turn the pelvis forward, relaxing the abdomen in the way that the fists are “immersed” in the space between the thighs and the abdomen. The more relaxed are the torso and hips, the less discomfort one feels from the fists' pressure. Remain in this position for a few breaths; then, on the inhale return to the starting position.
Effect: the abdominal organs are massaged; the digestive fire and toxins’ removal from the body are stimulated.
7. Setu bandha sarvangasana
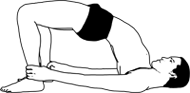 Initial position: lying on the floor, legs are straight, arms are placed alongside the body.
Bend the knees, pressing the feet against the floor. Toes are parallel; the distance between them is the width of pelvis. Take your shins into your hands. If you are not able to hold them, you may press the open downwards palms of straight arms against the floor parallel to each other. Inhale and on the exhale push your pelvis up using your lower back muscles, hip muscles, as well as buttock muscles. Your neck and face stay relaxed. The hands are holding the shins, but try not to pull them towards yourself and continue to keep the asana by working the hips, back and buttock muscles. Stay in the asana for a few breaths, and then lower the pelvis, straighten the legs and relax.
Effect: the muscles of the lower body area and hips are worked out. The asana affects the lower spine section, tail base and hip joints. The thoracocervical spine gets stretched. The asana positively influences the thyroid gland area as well.
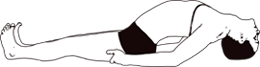
8. Ardha Halasana
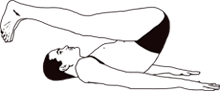 Initial position: lying on your back, arms are placed alongside the body with palms down, legs are straight.
Bend your knees; move the hips closer to the torso. Then, straightening the legs, push the heels towards the ceiling. Push the palms off the floor and, on the exhale, take the pelvis off the floor stretching the toes and hips in the direction of the space behind the head. Straight hands should lie tightly the floor. Pull up the knee caps, push your heels away from you, trying to straighten the legs parallel to the floor. Maintain the tonus in your pelvic and abdominal muscles. Relax the back of the head and the thoracic spine as much as possible; the neck and shoulder-blades lie relaxed on the floor. Stay in this position for a few breaths. Then, pressing your straight arms against the floor and still straining the pelvis, abdomen and hips muscles, gently lower the lower back and pelvis while exhaling. Then exhale again and lower the straight legs. If experiencing pain in the lower back, you can bend the legs and lower them afterwards. Relax.
Effect: muscles along the spine are loosened up. The asana affects the area of the sacrum and hip joints, which releases the tension in the shin surfaces and hips.. The area between the shoulder blades loosens up if you try to relax the strained area from within.
9. Matsyasana with straight legs
 Initial position: lying on the floor with straight legs, hands are close the body, palms are facing up.
Bring the palms under the hips. Press your elbows, pelvis and the top of the head against the floor, arch the spine, gradually feeling the spine muscles at work, forming a bow along the spine. Pull up the toes of straight legs towards yourself, hold the knee caps in the pulled up position as well. Relax the face and the upper part of the chest. Breathe evenly, if possible Gradually try to achieve an even work out of the back muscles; then, over time, you can reduce the involvement of hands and legs and create an arch mostly involving your back.
Effect: deep muscles of the hips and back are worked out; the thoracic spine and shoulders open; slouching is eliminated. This asana is a good substitute for the inverted asanas (Halasana, Sarvangasana).
10. Ardha Matsyendrasana
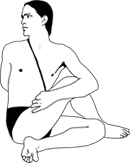 Initial position: sitting on the floor with straight legs, the back is straight.
Bend the right knee, put the right foot to the left of the pelvis, with the sole upwards. The heel of the bent leg should be as close to the hip as possible. Bend the left leg, move it over the right knee and place the the sole firmly on the floor. Straighten the spine, making the shoulder line horizontal. Wrap the right arm around the left knee and hip, pressing the hip to the torso. Straighten the left arm, place its palm against the floor. If you can, bring the palm behind the back while the back side of the hand slides across the lower back in the direction of the base of the hip of the opposite leg. Rotate the torso to the left, around its axis, while maintaining the balance and the vertical position of the spine. Turn your head, neck and eyes in the direction of the twist; look all the way to the left.. Try to relax eye muscles as much as possible in this position. Keep your pelvis vertical, aligning it with the torso and not leaning to the back or to the sides.. Try to stretch your torso and spine upwards and simultaneously to rotate them around their axis. Gradually, as the spine steadies in the vertical position, relax the hips and lower the pelvis with both seat bones onto the floor. Open the shoulders and relax them at the same time. When stretching and twisting the spine, try to use your arms at a minimum, which will raise the effectiveness of the work of the involved muscles of the torso and spine.Stay in this position for a few breaths. Return to the starting position. Switch sides and repeat.
Effect: the asana affects the whole spine column, stretching and twisting it. Abdominal and pelvic areas are influenced as well. External hip areas loosen up and open.
11. Gorakshasana
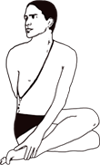 Initial position: sitting on the floor with straight legs; the back is straight.
Bend the left knee, put the left foot to the right of the pelvis, with the sole upwards. The heel of the bent leg should be as close to the hip as possible. Bend the right leg, move it over the left knee and place the sole to on the side of the pelvis, with the sole upwards. Ideally, when the hips and ankle-joints are loosened up, the knees of bent legs are placed one over the other and the upper hip touches the lower hip.
If you are flexible enough, take the right foot into the right hand, while the left hand slides across the lower back and tries to touch the foot that ends up behind the back. Simultaneously turn your torso and head to the left. Straighten the spine, making the shoulder line horizontal. Hold the neck stretched slightly from the shoulders so that the attempt to grab the feet does not lead to a loss of tension along the spine. Look away to the side, in the direction of rotation. In the final position, hold your back straight, relaxing hips and shoulders, as well as face and breathing. Stay in this asana for a few breaths. Inhale and return to the initial position. Then switch sides and repeat.
Effect: hips and shoulders are loosened up; muscles and ligaments along the spine are worked out.
12. Mandukasana
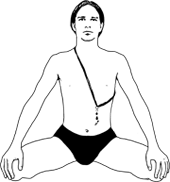 Initial position: Vajrasana (the back is straight, knees and toes are joint together). Bring your knees to the sides, placing them wide apart. The big toes are touching each other. Ideally, your pelvis rests between the heels; if it is too difficult, you can put it on your heels. Straighten the spine; relax your shoulders, face and breath.