News
-
 Pranayama workshop, Mar 1-7
-
 21-day Pranayama challenge
-
 Nāda meditation workshop, January 8-12
-
 April 3, Navaratri with Yogi Matsyendranath Maharaj, Australia, Queensland
-
 March 17, 2020. Purifiying Pranayama With Yogi Matsyendra Nath
-
 November 2019, Tantra Workshop Series in Argentina
-
 Workshop in Gualeguaychu
-
") 17-18 November 2018, Yogi Matsyendranath in Źarate (Argentina)
17-18 November 2018, Yogi Matsyendranath in Źarate (Argentina)
-
 15-16 November 2018, Yogi Matsyendranath visit to Uruguay
-
") 12 Nov 2018, Lecture at USAL (Salvador University)
12 Nov 2018, Lecture at USAL (Salvador University)
-
") 10-11 November 2018, Workshops in Quilmes and La Plata (Argentina)
10-11 November 2018, Workshops in Quilmes and La Plata (Argentina)
-
") 8 November 2018, Open conference in Necochea (Argentina)
8 November 2018, Open conference in Necochea (Argentina)
-
 2,3,4 November 2018 - Participating in XVI Retreat International of Yoga and Meditation
-
 13-16 June") Programme in Québec (Canada) 13-16 June
Programme in Québec (Canada) 13-16 June
-
 Melbourne Book Launch
-
 4-years Summer Program
-
 Biography of a Russian Yogi
-
 November 2017, Visit of Yogi Matsyendranath to Argentina
-
 Satsangs of Yogi Matsyendranatha Maharaj in Berlin
-
") Seminars and trainings in June-July 2015 (France)
Seminars and trainings in June-July 2015 (France)
Asana set #5
1. The Utkatasana Cycle
Utkatasana (1a)
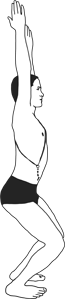
Initial position: standing, the distance between soles is the width of pelvis, toes are parallel, arms are lowered alongside the torso.
Inhale and bring the palms of straight hands up vertically, at the same time slightly bending the knees. The torso is vertical, do not hold your breath. Attention is focused along the spine, distribute its tension evenly across its whole length, then also stretch the shoulder blades and shoulders up. Try to hold the back straight and avoid forming a big bend in the lower back. Soles are firmly pressed against the floor; do not lift your heels. Stay in this asana for several breaths, then exhale and perform ardha uttanasana (1b).
Effect: this asana strengthens calf muscles, hip muscles and back muscles; it stretches the shoulders, shoulder blades and thoracocervical spine.
Ardha Uttanasana (1b)
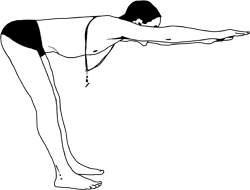
Initial position: utkatasana.
Inhale and rotate the pelvis and torso with stretched palms, parallel to the floor. Toes are parallel to each other. In this position the palms, the back of the head and shoulder blades stretch the spine forward, but the lower back and pelvis create the stretching movement of the spine backwards. Try to rotate the line of the torso, pelvis and arms parallel to the floor. At first, you can create a slight bend in the lower back, which will not be visible, but which the tendency towards straightening the back will be formed. At the beginning of learning this asana, you may slightly bend your knees so that the tension in the hamstring does not prevent the rotation of the pelvis parallel to the floor. Stay in this position for several breaths, after that exhale and move to uttanasana (1c).
Effect: the evenly distributed tonus is formed, simultaneously stretching the muscles along the spine; the shoulders, shoulder blades, pelvis joints are opened; the lumbosacral region of the spine is worked out and muscle tension in this area is eliminated.
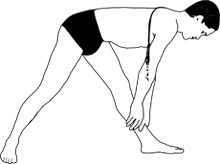
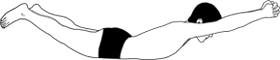
Uttanasana (1c)
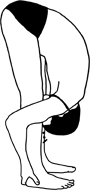
Initial position: ardha uttanasana (1b).
Exhale and lean forward, relaxing the back muscles, allowing the pelvis and torso to rotate vertically and down. Take hold of the ankles with your palms from behind, press the upper arms against the back of the calf. If the torso is positioned far from the calves and hips, you may first slightly bend your knees in order to reduce the distance between the torso and the hips right away. This allows to slightly turn the pelvis in the pelvis joints under the body weight while the lumbosacral region of the spine is not yet relaxed enough. While the lower back and sacrum are being relaxed, you may gradually straighten your legs, controlling your sensations and avoiding the feeling of discomfort under the knees. Slightly pull up the kneecaps and the muscles of the front surface of the hips, as well as the lower abdomen and the perineal muscles. If experiencing high blood pressure, slightly throw back your head while looking at the big toes. If there are no problems with blood circulation in the head and neck area, pull the chin up slightly towards the torso, stretching the back and the top of the head down, but avoid creating uncomfortable tension in the back of the head, the lower back and the hamstrings. In the final position try to press the torso, pelvis, shoulders and forehead against the hips and calves.
Effect: the back surface of the legs is relaxed; the lumbosacral region of the spine, as well as the whole spine are gently stretched downwards under the weight of the head and torso. The muscles of the front surface of the hips and the deep muscles of the abdomen are strengthened. To a degree, the chest and neck muscles are exercised.
2. The Trikonasana Cycle
Utthita Trikonasana (2a)
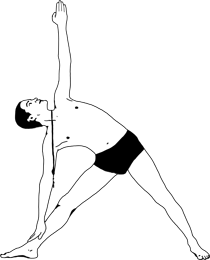 Initial position: place your feet parallel to each other, two shoulder-widths apart. The torso and pelvis remain in the same plane.
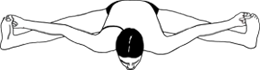
Turn the toes to the left; the left toe – at 90 degrees, i.e. into the torso plane, the right toe – at 45-60 degrees (by feel). Inhale and stretch the palms to the sides, forming the straight arm line. On an exhalation, lean the torso to the left, until feeling slight tension in the side surface of the torso and the right hip. While doing this, keep the pelvis, torso and legs in the same plane. The lower palm is holding the calf, the upper palm and shoulder blade are stretching towards the ceiling so that the straight arms line is stretched vertically, perpendicular to the floor. Gradually trying to turn the neck and the head so that the chin and relaxed gaze are directed up, towards the palm. Keep your gaze relaxed, fixing it on one point. This contributes to the stable position of the body and the development of inner balance. Stay in this asana for 5-7 even breaths through the stomach; after that perform trikonasana (2b):
Utthita Trikonasana (2b)
Lower the palm, which was extended upwards, secure it on the calf next to the palm, which was down. Simultaneously turning the pelvis inwards, closing it. In the final position, the shoulders and the pelvis are positioned in the same plane. Slightly shift the centre of gravity backwards, transferring more weight to the back foot. If there is too much pressure on the hamstring of the front leg, you can slightly bend it at the beginning. Over time, as discomfort is reduced, the leg can be straightened. Slightly bending the lumbar part of the spine, gradually try to achieve the horizontal position of the spinal line. Your gaze is directed downwards, the top of the head is stretched forward, and the tail bone – backward, over time creating the evenly distributed tension of the spine. Hold several breaths and perform parivritta trikonasana (2c):
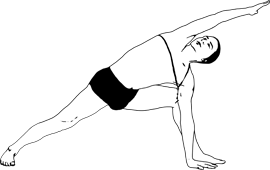
Utthita Trikonasana (2c)

Leave the opposite palm on the calf, straighten the second arm and stretch it upwards. In the final position the shoulder girdle and the arms line are turned to the side that is opposite to the position of the arms in utthita trikonasana; meanwhile, the pelvis is closed and you should try to not to change the position of the legs. Make sure that the torso plane is parallel to the plane of the legs. Stay in this position for several breath cycles, then exhale and bring down the upper palm; inhale and return the torso to the vertical position.
Effect: this series of asanas actively involves the significant number of leg, torso, and shoulder girdle muscles, as well as the muscles along the spine.
3. Parsvakonasana
 Initial position: feet are wide apart, toes parallel to each other. The pelvis, torso and legs represent the same plane.
Effect: the hip muscles and the shoulder girdle are worked out; the side surfaces of the torso are stretched.
4. Garudasana
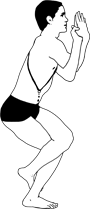 Initial position: tadasana, standing up with a straight back.
Slightly bend the left leg, lift the right sole from the floor and intertwine your right leg with the left leg so that the right thigh is on top of the thigh of the pivot leg, and the toe of the right foot is trying to slide across the back surface of the pivot calf. Bend the arms and cross them over in the similar way so that the left forearm is placed on top of the right forearm, and the palms are locked together. In the beginning of learning this asana, if you are not able to intertwine your legs, you may cross them over. Stay in this asana for several breaths, then repeat with the cross of the arms and legs reversed.
Effect: this asana works out the muscles and joints of the arms and legs; affects blood circulation and the functioning of the organs of the small pelvis.
5. Virasana
 Initial position: standing on your knees, the distance between the knees – about two fists, between the toes – slightly bigger than the pelvis width.
Gently lower the pelvis between the heels. If experiencing intense discomfort in the hips and knees, you may first place your feet not too far from each other, like in vajrasana, and then, gradually, as the feeling of discomfort is reduced, you can move your heels wider and, finally, lower the pelvis between them. In the final position straighten your back, place your palms on your knees, and relax your hips, feet, shoulders, face and breath.
Effect: the muscles of the hips and calves are worked out; the knee and ankle joints are relaxed. This asana may be used as a variant of the meditative asana.
6. Ustrasana
 Initial position: virasana; the toes are directed backwards.
Place the palms on the soles, the palms of both hands are facing backwards. Inhale and on an exhalation lift the pelvis and hips, stretching the spine along the arch, backwards and up. Try to hold your neck suspended in the air so that its stretch is extending the line of the spine. Simultaneously relax the chest muscles, opening the shoulders. Ideally, an even tension from the knees, along the hips and the front surface of the torso, and up to the chin is created. The pressure is distributed between the actively working hip muscles and the muscles along the spine. If it is difficult for you to grab the ankles, you may, while standing on your knees, stretch upwards across the arch, pressing both palms against the sacrum, with the fingers facing down. Your gaze is directed forward and up; the attention is fixed on one immobile point; gradually, if possible, even your breathing. If it is difficult for you to perform this asana at the beginning, breathe as you can; breathing is free, without interruptions. Stay in this position for several breaths, then on an inhalation return to the starting position.
Effect: the front surface of the torso and legs is stretched and strengthened at the same time; the rib cage and shoulders open; the muscles along the spine are toned.
7. Baddha Konasana
 Initial position: sitting with a straight back and legs.
Bend the legs, pulling up the heels towards the crotch. Take your feet into your hands, folding them together; lower the knees of the bent legs. Push the pelvis slightly forward, straightening the back. Before lowering the knees, you can several times raise and lower your hips, while watching closely the sensations in the leg muscles, relaxing internally towards the movement. Stay in this asana for several breaths, maintaining the tension along the spine, relaxing and lowering the shoulders.
Effect: this asana contributes to the opening of pelvis joints and stretching the muscles of the inner surfaces of the hips.
8. Naukasana
Initial position: lie on your stomach with your legs straight, toes are together, arms are stretched forward, fingers are twined in a lock.
While staying on the floor, stretch the finger lock and the top of your head forward, the chin stays slightly pulled up towards the torso, the hips and the lower back are being stretched backward. Observe the resulting feeling of tension along the spine; over time try to reach an even tension across the whole length, from the hips to the lock. Then lift up the finger lock and straight legs from the floor, controlling the feeling of tension. Continue to look downward, stretching the top of the head forward and up, the shoulders are trying to reach the level of the ears. Do not hold your breath. Stay in this asana for several breaths, after that, on an exhalation, return to the starting position.
Effect: the spine is stretched; at the same time, all the muscles along it, the outside and inside surfaces of the hips, as well as shoulders and shoulder blades are worked out. The organs of the abdomen are massaged. It contributes to shaping the correct posture eliminates slouching.
9. Upavistha Konasana
Initial position: sitting with a straight back and straight legs.
Move the heels to the sides, the toes of the straight legs are facing up. Take the big toes into your hands and, with an exhale, lean your torso and pelvis forward and down. At the same time, tighten the muscles of the crotch, the upper surfaces of the hips and pull up the lower part of the abdominal wall as if you were trying to lift the straight legs off the floor with the help of leg muscles and torso. As the torso is leaning forward, instead of lifting the legs off the floor, the pelvis and the torso will rotate forward. This method allows to perform the lean without using the force of the arms. The arms are stretched to the sides and a bit upwards, more for opening the shoulders; however, they are also slightly pulling the feet to the sides and up. The heels will stay on the floor, but the lean will slightly increase. If experiencing strong tension in the lower back and under the knees, which makes the torso and pelvis lean backwards, you may at the early stages of learning this asana bend your legs. This allows to create the lean while turning the pelvis in the pelvis joints without overloading the lower back and hamstrings. While training your body to feel the lean in the simplified form, you can learn to form a pleasant muscle tension. Over time, this allows to make progress in performing this asana. When the pelvis starts to open in the pelvis joints, and shoulders and forehead are getting closer to the floor, try to gradually straighten your back. This works as an instrument that allows to open the pelvis joints even more and to relax the inside surface of the hips.
Effect: the pelvis joints are opened; the lumbosacral region of the spine, shoulders and inside surfaces of the hips are relaxed.
10. Sarvangasana
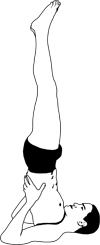 Initial position: lying on the floor, straight arms lie along the torso, the palms are turned down.
Press the straight arms against the floor, bend your legs and then push your heels upwards. Push yourself off the floor with the straight arms and stretch the toes of straight legs upwards and a bit towards “yourself, lifting the pelvis off the floor. Place the palms on the lower back, the fingertips facing up. Stretch the straight legs and lower back upwards. While keeping under control the tonus of the muscles, which are stretching the torso and legs, move to palms (if possible) closer to the shoulder blades. At the same time, watch that most of the work of stretching is done by the torso and legs; the palms are supporting the reached position only to a degree, allowing to relax the muscles, involved in the stretch. Watch that the back of the head and facial muscles are as relaxed as possible; most of the body weight should be supported by the shoulders and shoulder blades. Ideally, as you master the asana, the torso and leg muscles begin to work in unison, which allows to align the legs and torso along one straight line. You should avoid the active involvement of the arms in order to avoid the extreme stretching of the back of the head. It is possible that during the early stages of learning the asana a certain angle between the torso and hips will remain. You should not force the stretch, maintaining a calm and even state, which allows to better control performing this asana and to avoid injuries. In other words, if your body does not “let” you go further, you should stay in the position that is available to you at that particular stage without overworking and accelerated breathing. Stay in this position for several breaths. After that, first slightly bend the straight legs towards the torso, press the straight arms against the floor and then lower the pelvis and legs. If, when lowering your pelvis and legs, you are experiencing distinct discomfort in the lower back, you may bend your legs while lowering them. When are back on the floor, stay in the lying position for a few minutes, relaxing your muscles and breathing.
Effect: the body is stretched, from shoulder blades to toes; the venous circulation is normalised. The asana is recommended for mental fatigue and swelling of the legs. The thyroid blood supply is improved, which positively effects the metabolism and overall well-being. It also contributes to the rejuvenation of the organs.
11. Viparita Karani
 Initial position: the same as in sarvangasana.
The entrance into this asana is the same as in sarvangasana. The difference is that in the final position an angle is formed between the torso and straight legs. The toes of straight legs are placed tentatively on the line that is extended from the eyes and vertically upwards; the line of the pelvis extends the line of the lower back, i.e. we try to avoid the bend in the lower back. The torso is positioned approximately at a 45-degree angle with the floor. The palms are holding the pelvis from below; the hands are turned in the direction of seat bones. The exit is the same as in sarvangasana.
Effect: the benefits are similar to those of sarvangasana; the difference is that in viparita karani prana and apana come together in the area of Manipura.
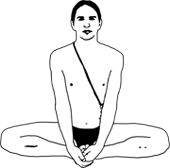
12. Ardha Padmasana
 Initial position: sitting with a straight back and straight legs.
Bend your left leg and press its sole against the right thigh. Bend your right leg and place its sole on the left thigh, touching the lower abdomen with the heel. Hold the spine in the vertical position; relax the shoulders and the face. The palms are relaxed and lying on the knees. Stay in this asana for several even breaths or longer (by feel); avoid the increasing discomfort in the back, thighs and knees.
Effect: the asana opens the pelvis joints, relaxes the hip muscles, and helps prana to flow to Sushumna.