News
-
 Pranayama workshop, Mar 1-7
-
 21-day Pranayama challenge
-
 Nāda meditation workshop, January 8-12
-
 April 3, Navaratri with Yogi Matsyendranath Maharaj, Australia, Queensland
-
 March 17, 2020. Purifiying Pranayama With Yogi Matsyendra Nath
-
 November 2019, Tantra Workshop Series in Argentina
-
 Workshop in Gualeguaychu
-
") 17-18 November 2018, Yogi Matsyendranath in Źarate (Argentina)
17-18 November 2018, Yogi Matsyendranath in Źarate (Argentina)
-
 15-16 November 2018, Yogi Matsyendranath visit to Uruguay
-
") 12 Nov 2018, Lecture at USAL (Salvador University)
12 Nov 2018, Lecture at USAL (Salvador University)
-
") 10-11 November 2018, Workshops in Quilmes and La Plata (Argentina)
10-11 November 2018, Workshops in Quilmes and La Plata (Argentina)
-
") 8 November 2018, Open conference in Necochea (Argentina)
8 November 2018, Open conference in Necochea (Argentina)
-
 2,3,4 November 2018 - Participating in XVI Retreat International of Yoga and Meditation
-
 13-16 June") Programme in Québec (Canada) 13-16 June
Programme in Québec (Canada) 13-16 June
-
 Melbourne Book Launch
-
 4-years Summer Program
-
 Biography of a Russian Yogi
-
 November 2017, Visit of Yogi Matsyendranath to Argentina
-
 Satsangs of Yogi Matsyendranatha Maharaj in Berlin
-
") Seminars and trainings in June-July 2015 (France)
Seminars and trainings in June-July 2015 (France)
Asana set #6
1a. Ardha Chandrasana a
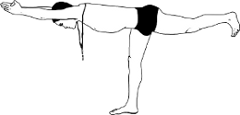
Initial position: standing.
Lean your torso forward, touching the floor with the tips of the fingers. Slightly bend your legs, stretch the hip and the toe of the right leg backward. Shift the centre of gravity so that the pivot foot is placed firmly on the floor, from the toes to the heel. Lift the palms off the floor and fold them at the chest level, evening the centre of gravity. Then stretch the folded palms forward. Do not hold your breath. In the final position the right hip, knee and toe are stretched backward; the pelvis is closed. The palms, shoulders and the top of your head are stretched forward. The line of the neck extends the line of the spine; the gaze is fixed on any steady point. Stay in this asana for several breaths. Then lower that palms and the foot, switch the leg position and stretch the palms and the back of the head forward once again. Return to the starting position.
Effect: this asana helps to develop good balance and stabilizes the mind; it works out the muscles of the back, shoulders and hips. The asana rather quickly activates the flow of pranas in the energy structure; tones up the body and mind.
1b. Ardha Chandrasana b
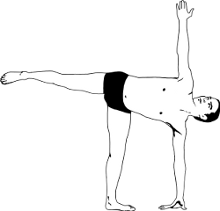
Initial position: standing up, the feet are two shoulder-widths apart.
On an exhalation, slightly bend your left knee. Place the fingertips of the left palm on the floor at a distance of approximately one foot from the toe of the left leg. Shift the centre of gravity and body weight slightly forward, while at the same time lifting the right leg off the floor and moving the hip to the position parallel to the floor. Gradually, feeling confidence and support, try to open the pelvis and move it to the same plane with the thigh of the pivot leg. Lift up your right palm while opening the shoulders and rotating the torso so that the pelvis, the shoulder line and the pivot leg are positioned in the same vertical plane. The neck extends the line of the spine. Turn your head with the chin facing up and look at the palm that is stretched upward. Stay in this asana for several breaths. Then lower the palm, close the pelvis, bring down the leg and return to the starting position. Switch sides and repeat.
Effect: the benefits of this asana are the same as of ardha chandrasana (a). Additionally, it opens the pelvis joints, works out the lumbosacral region of the spine, the outside surfaces of the hips and the buttock muscles. It also opens the shoulders and the ribcage.
2. Upavistha Konasana (vertical)
 Initial position: sitting down with legs straight.
Bend the knees, take the big toes into your hands. Push the torso towards the hips; if possible, keep the back straight and lift the heels slightly off the floor. Fix the balance, as well as the presence of stable attention at any immobile point in front of you. If the lower back does not lean backwards and the posture is in a steady position, slightly straighten your legs to a 90-degree angle between the hips and the calves. Straighten the back and maintain stable attention. Even your breathing. Once again straighten your legs slightly, pulling up the kneecaps, and, pushing the heels upward, stopping the straightening of the legs and fixing the most stable position, in which the back stays relatively straight and the balance is felt. When the legs are straightened and you feel confident in being able to perform this variant of the asana, move your heels to the sides, while continuing to keep the back and legs straight. If it is difficult to perform the asana with the straight legs and back, you may slightly bend your knees but the back should stay straight. Stay in this asana for several breaths; then return to the starting position: bring the heels together, bend the knees, lower the heels to the floor.
Effect: the hips are worked out, as well as the muscles of the pelvis, the lower abdomen and the lower back. The asana opens the shoulders, the inside surfaces of the hips, the pelvis joints and the area of hamstrings. Correct posture is formed; the lumbosacral region of the spine is worked out. Indirectly, by means of maintaining the balance, the asana contributes to the development of mental stability.
3. Supta Virasana

Initial position: virasana.
Take your ankles into your hands, carefully leaning backwards. Shift the weight first to the elbows, relaxing the hips and the lower back. If you do not experience strong discomfort in the lower back, scrotum and knees (you may experience slight discomfort, which should decrease as you relax more), lower the back and the top of your head, leaning against them and the elbows. When the body gets used to the sensations, carefully lower the shoulders and shoulder blades, relaxing the back, the hips and the feet. Then twine your fingers into a lock on the back of your head, move the elbows to the sides and relax in this position. Stay in this asana while experiencing a pleasant relaxation of the muscles; then, leaning against the elbows, raise your torso and return to the starting position.Effect: the muscles of the upper surface of the hips and of the abdominal wall are stretched. The asana affects the lower back and the scrotum; if the muscles of the back and hips are sufficiently relaxed, the lumbar lordosis is reduced. The asana also lifts the fatigue in the leg muscles that is caused by extensive walking.
4. Ardha Malasana
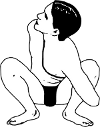
Initial position: squat down, the distance between the heels is about 10-15 cm.
Extend the palms forward, straightening the arms, but leaving the weight on the whole foot. Move the left arm to the side, pushing the left calf backward with the shoulder, bending this arm in the elbow, and pressing the back of the palm against the lower back. Move the second shoulder and shoulder blade backward (without grabbing the calf) and lock the fingers of both arms behind the back. Even the centre of gravity, placing the feet on the floor, and relaxing the ankle-joints and the hips of bent legs. The left shoulder and shoulder blade move forward, the right shoulder – backward. In the final position, relax the shoulder and shoulder blade muscles, gradually straightening the spine. Stay in this asana for several breaths, then reverse the position. If it is easy enough for you to keep the fingers locked behind the back, you may put your left thumb into the fist, and take your left wrist into your right hand. Watch the evenness of your condition and breathing; this is the criterion of confident performance.
Effect: the muscles of the shoulders and shoulder blades are worked out; the asana indirectly affects the cervical, thoracic and lumbar regions of the spine. The organs of the abdomen are massaged, the pelvis and ankle joints are opened, the calf and hip muscles are worked out.
5. Gomukhasana
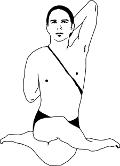 Initial position: sitting on the floor with straight legs, the back is straight.
Bend the left knee, place it to the right of the pelvis with the sole facing up. The heel of the bent leg should be as close as possible to the pelvis. Bend the right knee, bring its foot over the left knee and put the heel next to the pelvis, the sole is turned up. Ideally, when the hips and ankle joints are relaxed, the knees of bent legs are placed on top of each other, and the upper thigh is touching the lower one.
Stretch the straight left arm upward, the right arm – downward. Bend the arms in the elbows and lock the fingers behind the back. Straighten the back, slightly stretching up the top of the head and the left elbow. Relax the hips. Stay in this position for several breaths. Lower the locked fingers, reverse the position of your legs and arms.
Effect: this asana opens the pelvis points, the thoracic region of the spine and the shoulders.
6. Ardha Baddha Padma Paschimottanasana
 Initial position: sitting down with the straight back and legs.
Bend your left leg to the maximum, pulling up the heel of the bent leg towards the groin bend. Ideally, the heel of the bent leg should be pressed against the stomach. Straighten the back and push the pelvis forward so that the sole of the foot of the bent leg is turned up but the hip and knee (if there are no blocks in the lower back and hip) are brought down. If the knee is not touching the floor, you should not push it down with you hand because it may injure the joint. The toe of the straight leg is facing up. Bring the back of the hand of the left arm behind that back, moving the shoulder and shoulder blade backward and down. Take the toes or the big toe of the right foot into the right hand. Try to grab the big toe of the bent left leg with the thumb, the index finger or the middle finger behind the back. Push the pelvis, the torso and the heel of the straight leg; as a result, the pelvis is turned forward in the pelvis joints, and the heel of the bent leg starts to push against the stomach. Relax the stomach, allowing the heel to “drop” into it. The spine and the top of the head are stretched forward and down. Try to relax the lower back, the stomach and the lower surface of the straight leg to the maximum. Relax your breathing and face. Stay in this asana for several breaths.
Return to the starting position, switch sides and repeat.
Effect: this asana stretches the spine and the lower surfaces of straight legs, massages the organs of the abdomen. The shoulders are opened; the slouching is eliminated.
7. Twisting in Ardha Padmasana
 Initial position: ardha padmasana, the left foot is on top.
Bring the left arm behind the back, sliding the back of the palm across the lower back. Move the left shoulder and shoulder blade backward. Try to grab the big toe of the left foot. Lower the second palm onto the knee of the opposite leg. Stretch the spine upward and turn it to the left, maintaining the position of the shoulder at the same level. Hold the pelvis and the lower back vertically. The gaze is directed at the extreme position of the potation, i.e. to the left. Simultaneously, as much as you can, relax the eye and face muscles. In the final position, the spine is stretched upward and twisted around its axis, the shoulders are relaxed and lowered. Relax the hips and feet, while continuing to hold the pelvis and lower back in the vertical position. Breathe evenly. Stay in this asana for several breaths; then return to the starting position and relax. Switch sides and repeat.
Effect: this asana works out the muscles of the hips and the torso; tones the spine; opens the shoulders.
8. Salabhasana
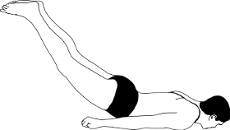 Initial position: lying on the stomach, face down, the chin is on the floor, arms are placed alongside the torso.
Take the thumbs into the fists. Press the fists and straight arms against the floor. Inhale and then, while exhaling slowly, push away from the floor with your arms, lifting both legs off the floor, stretching the toes, hips and the back area of the spine backwards and up. While observing the work of the back muscles, distribute, ideally, this load between all the muscles, from the thoracic area to the sacrum; the upper and inside surfaces of the thighs are working, which also should be kept in tonus. At first, the breathing may be blocked because of the pressure on the abdominal area, but gradually, while you are mastering the asana, you will be able to control the position of the body and to breathe freely. At this stage, it is possible to talk about the body control in the asana and to try to lift the legs and the torso higher. If the breathing is blocked or supressed, stay in this position until it evens out. Stay in this asana for several breaths, then return to the starting position.
Effect: the lower area of the spine and the legs are worked out; the diaphragm and the lungs are affected. The muscle stamina of the back and legs is formed for more prolonged load; the nervous system is toned; the bowel activity is stimulated.
9. Paripurna Navasana
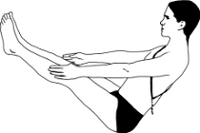 Initial position: Sitting down with the straight back and legs, the palms of straight arms are pressed against the floor, the spine is stretched upwards.
Bend your legs, extend the palms of straight arms forward, trying to pull the torso and the hips of the bent legs closer to each other. When the balance in this position is reached, and the lower back stops leaning backwards, slightly lift the heels off the floor and again secure the back and balance. After reaching the stability in this position, straighten the legs until the minimally short distance between the thighs and the torso is maintained. If this distance starts to increase and the torso leans backward, strop straightening the legs and secure the maximally stable variant of performing this asana, while observing the sensations in the thigh, pelvis and abdominal wall muscles, as well as holding the back straight if possible. In the final position, the legs are straight, the toes and the back of the head are stretching upwards, the palms of straight hands are extended forward, the kneecaps are pulled up. The pelvis is touching the floor with the seat bones; try not to roll it back towards the tailbone, otherwise the back will round in the lumbar part. Stay in this asana for several breaths, after that return to the starting position.
Effect: the thigh, pelvis, stomach and back muscles are worked out; correct posture is formed; slouching is eliminated.
10. Ardha Chakrasana A
 Initial position: lying on the back.
Bend your knees, placing the feet approximately at the pelvis width from each other, so that the heels are as close as possible to the pelvis and the toes are parallel to each other. Bending the arms in the elbows, place your palms on the floor, at both sides of the head, turning the fingers towards the shoulders. Lift the pelvis off the floor, transferring part of the body weight onto the palms and, rolling from the back of the head to the top of the head, slightly lean against it as well. The angle between the calves and the hips should be about 90 degrees. Stay in this asana for several breaths, and then lower the shoulders and the pelvis, returning to the starting position.
Effect: this asana works out the leg and back muscles, the shoulders; it also tones up the spine.
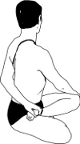
11. Karnapidasana
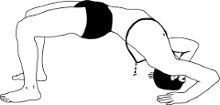 Initial position: halasana.
When the muscles of the back and legs become relaxed enough in halasana, gradually bend your legs, lowering the knees, and waiting for further relaxation of the muscles of the back and legs, until the hips are pressed against the torso. Then take the feet into your hands and, simultaneously pressing the shoulders and shoulder blades against the floor, and thus reducing the pressure on the thoracocervical region of the spine, continue to lower the knees by means of relaxing the muscles of the back, the buttock muscles and hips. In the final position, the knees are touching the floor from the right and left sides of the head; watch for any harsh sensations in the nape area and on the border of the neck and the thoracic spine. The desire to reach the final position should not overwhelm the comfort of your sensations. The thoracocervical region of the spine often becomes the area of the vertebrae dislocation; therefore, common sense requires extreme carefulness in performing this asana, as well as attention to one’s sensations. The area of contact of the back with the floor should be maximal, i.e. the shoulders, the upper part of shoulder blades and he nape should be placed on the floor, equally distributing the body weight between them. Stay in this asana for several breathing cycles, and then return to the starting position (halasana); then press the palms of straight arms against the floor, and lower the torso, the pelvis and the legs.
Effect: this asana reduces the muscle tension along the spine, as well as the mental tension and fatigue; it affects the vessels of the neck and head, improving blood circulation in this area.
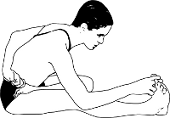
12. Paschimottanasana
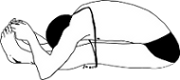 Initial position: sitting down with the straight back and legs. The toes are facing up, push the heels of straight legs slightly forward.
Inhale and stretch the palms, the shoulders and the torso upwards; on an exhalation lean the torso, gradually rotating the pelvis forward. Take the feet into your hands, lower the torso onto the hips, slightly stretching the spine with the crown of the head facing forward; pull up the kneecaps, tense the crotch muscles and the lower part of the abdomen. Relax the back muscles, as well as the lower surfaces of the legs, leaving a slightly felt tension of the spine forward, from the lower back to the nape. Stretch the elbows and the shoulders with shoulder blades forwards and down, simultaneously relaxing the resulting muscle tension in this area so that over time the forearms end up on the floor. Gradually let go of the tension of the spine, holding this position by means of the minimal tonus of the muscles of the pelvis, the abdomen and the hips. Then relax the whole body if, while doing so, the stomach stays pressed against the hips and the knees are not bent. The breathing is even and relaxed. Stay in this asana for as long as the even and comfortable condition of the body and mind allows it (by feel). Return to the starting position.
Effect: the whole surface of the back along the spine and the lower surfaces of the legs are stretched; the pelvis joints are opened.