News
-
 Pranayama workshop, Mar 1-7
-
 21-day Pranayama challenge
-
 Nāda meditation workshop, January 8-12
-
 April 3, Navaratri with Yogi Matsyendranath Maharaj, Australia, Queensland
-
 March 17, 2020. Purifiying Pranayama With Yogi Matsyendra Nath
-
 November 2019, Tantra Workshop Series in Argentina
-
 Workshop in Gualeguaychu
-
") 17-18 November 2018, Yogi Matsyendranath in Źarate (Argentina)
17-18 November 2018, Yogi Matsyendranath in Źarate (Argentina)
-
 15-16 November 2018, Yogi Matsyendranath visit to Uruguay
-
") 12 Nov 2018, Lecture at USAL (Salvador University)
12 Nov 2018, Lecture at USAL (Salvador University)
-
") 10-11 November 2018, Workshops in Quilmes and La Plata (Argentina)
10-11 November 2018, Workshops in Quilmes and La Plata (Argentina)
-
") 8 November 2018, Open conference in Necochea (Argentina)
8 November 2018, Open conference in Necochea (Argentina)
-
 2,3,4 November 2018 - Participating in XVI Retreat International of Yoga and Meditation
-
 13-16 June") Programme in Québec (Canada) 13-16 June
Programme in Québec (Canada) 13-16 June
-
 Melbourne Book Launch
-
 4-years Summer Program
-
 Biography of a Russian Yogi
-
 November 2017, Visit of Yogi Matsyendranath to Argentina
-
 Satsangs of Yogi Matsyendranatha Maharaj in Berlin
-
") Seminars and trainings in June-July 2015 (France)
Seminars and trainings in June-July 2015 (France)
Asana set #7
1. Adho Mukha Krya
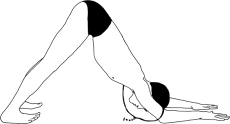
Initial position: standing on the forearms and knees, the distance between the forearms is approximately the shoulder length, and they are parallel to each other. The feet and knees are the pelvis length apart; the palms are tightly pressed against the floor.
Straighten the legs at the knees, pulling up the knee-caps and toes. Pushing away from the floor, stretch the spine backwards and up so that the shoulders and the torso are trying to be on the same line. The heels of straight legs are striving to reach the floor. The top of the head is hanging down; the gaze is directed towards the pelvis. Stay in this position for several breaths; then return to the initial position.
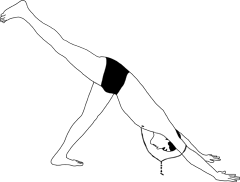
Perform adho mukha svanasana. While leaving the pelvis closed, stretch the left leg backwards and up, gradually extending the shoulders, the torso and the straight leg into one line. Try to leave the foot of the pivot leg in the steady position on the floor. Stay in this asana for several breaths. Lower the leg. Switch sides and repeat.
Effect: this asana contributes to the opening of the shoulders and the rib cage; the muscles of the hips and abdomen, as well as the ankle joints and the lumbosacral region of the spine are worked out.
2. Bhekasana
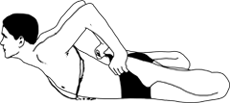 Initial position: lying on your stomach.
Bring the straight arms backward, bend the legs at the knees. Take the feet into your hands and pull the heels towards the pelvis. If the hip muscles are relaxed enough and you can pull your heels towards the pelvis without much effort of your hands, turn the palms of the hands so that the finger tips are facing forward. As a result, the elbows move upward, and the palms are pushing the feet in the direction of the floor. Lift the head and shoulders; retain this position while keeping the slight bend along the spine. Watch the sensations in the body closely, trying to avoid any pain in the knees and back. Stay in this asana for several breath cycles; then lower the head and shoulders, carefully straighten your legs, and relax.
Effect: the ankle and hip muscles are relaxed; the muscles along the spine are working actively; the shoulders and the thoracocervical spine open up.
3. Bakasana
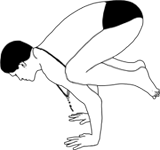 Initial position: standing up; feet are the pelvis width apart.
Effect: the asana improves blood circulation in the pelvic and abdominal regions; strengthens the arms; improves the sense of balance.
4. Astavakrasana
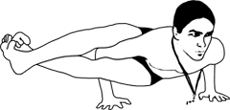 Initial position: sitting down with straight legs.
Pull up your knees towards the torso, bring the left shoulder under the thigh of the left leg so that the ham area of it can be placed on the shoulder. The palms are placed along one line and pressed against the floor; at the same time, the right palm is positioned alongside the right hip. Place the right ankle over the left foot. While slightly bending the arms at the elbows and slightly bending the torso, transfer the centre of gravity forwards. Transferring the body weight onto the hands, lift the pelvis off the floor. The inner surface of the left thigh is pressed against the shoulder. Straightening the legs at the knees, push the heels to left of the pelvis while balancing on your hands and maintaining the balance. The sight should be directed forwards and fixed on one point, the eyes are relaxed, and the breathing is even. Then bend your legs, lower your pelvis, and repeat the same in the other direction. In the intervals between the approaches and after performing the asana, you may rest in savasana or sasankasana.
Effect: the arm muscles are strengthened; the mental and the overall balance is formed; the internal organs are toned up.
5. Mayurasana
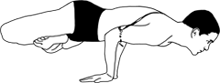 Initial position: padmasana.
While transferring the body weight forward, stand on your knees, and place the palms on the floor, turning the fingers towards the knees. The little fingers are touching each other. While leaning forwards, bend the arms at the elbows and bring the forearms together. Propping the elbows on the stomach, and the rib cage – on the arms from the elbows to the shoulders, carefully lift the knees off the floor, balancing on the hands. The attention is fixed on any point directly in front of you. Gradually, while mastering the balance, try to move the crossed in the lotus position legs and the torso into the horizontal state. Watch closely that the performance of the asana does not provoke excessive tension in the body. Hold your breath during the balancing. Stay in this position for a few seconds. Lower the knees. Return to the initial position.
Effect: the organs of the abdominal region are massaged; the wrists and forearms are strengthened; the asana contributes to the development of the attention stability.
6. Adho Mukha Padmasana
 Initial position: padmasana.
Leaving the legs crossed over and supporting yourself with the palms, move onto the stomach over the knees. As a result, the hips and the pelvis end up lying on the floor. Extend forward the folded together palms and relax. Stay in this asana for some time. Return to the initial position. Perform the reverse variation, switching the position of the legs.
Effect: the asana opens up the hips and the hip joints, as well as the lumbosacral region of the spine.
7. Sirsasana
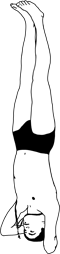 Initial position: standing on the knees and palms.
Lower the ankles and forearms onto the floor. Lace the fingers into the lock and set the forearms on the floor to form an angle between them of approximately 60 degrees.
Place the crown of your head at the vertex of that angle; the clasped fingers end up on the nape. Lift the pelvis and transfer some of the body weight onto the hands, feeling the lesser part of it on the crown. Bring the feet closer to the head, trying to move the torso into the vertical position. At the beginning, you may perform the variation with the slightly bent legs, gradually trying to strengthen them at the knees. Then try to slightly lift the feet off the floor, balancing and attempting to reach stability in the asana. When some stability is achieved, try to perform the stand with the bent legs, and then – with straight legs, moving the legs and the torso into one line. Try to support most of the body weight by the elbows and forearms, while stretching the whole body upwards. Breathe evenly and try to distribute the tension evenly along the whole body. Stay in this asana for several breath cycles; carefully lower the toes and then the knees onto to floor, and relax.
Effect: the muscles of the legs and the torso are stretched actively; the muscles of the abdominal wall and the pelvis are working; the slouching in the cervical and thoracic regions of the spine is eliminated; the hip joints are opened up.
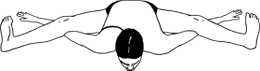
8. Halasana
 Initial position: lying on the back with the arms alongside the body.
Pushing away from the floor with the hands, lift the straight legs to the vertical position. Continue to push with the hands and lift the pelvis off the floor, moving the straight legs into the horizontal position. Place the palms on the lower back. Relax the shoulders and shoulder blades. Be careful to avoid the sharp bend in the thoracocervical region of the spine; most of the body weight should be supported by the shoulders. Gradually relaxing the hips and the back, let the toes come down behind the head. This is the final position; stay in it while relaxing the face and breathing. Choose that variation of the performance, in which the breathing and the nape are not supressed; in other words, do not rush to lower the legs until the leg and back muscles are relaxed. Stay in the final position for several breaths. Return the torso and the pelvis to the initial position; then lower the legs and relax.
Effect: the muscles along the spine and legs are stretched; the area of the thyroid gland is massaged.
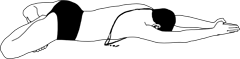
9. Matsyasana
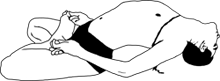 Initial position: padmasana.
Leaning the torso backwards and resting on the elbows and forearms, lower your head, touching the floor with the crown. Bending in the back and distributing the body weight between the crown, elbows, hips and the pelvis, take the big toes with the thumbs and the index fingers. Evenly distribute the feeling of tension along the spine, opening up the shoulders and the rib cage. Relax the throat and face. Breathe evenly. Stay in the asana for several cycles of even breathing. Lower the shoulders and shoulder blades while lowering the torso. Relax, paying attention to the sensations. Return to the initial position.
Effect: the shoulders and the rib cage are opened up; the area of the thyroid gland is stimulated. This asana is a good compensation for halasana and sarvangasana.
10. Ardha Chakrasana B
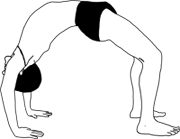 Initial position: ardha chakrasana – resting on the feet, palms and the crown of the head.
Then, while straightening the arms and legs, bend in the spine. Create the stretching motion of the spinal column, along the arch from the tailbone to the crown of the head. Continue to hold the toes parallel to each other. Relax the neck. Stay in this asana for several breath cycles. On an exhalation lower the torso, leaving the arms and legs in the bent position, and, after a couple of seconds, straighten the arms and legs, extending them along the torso and relaxing.
Effect: the spine actively bends in and stretches; the shoulders open up; the whole body is toned.
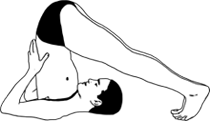
11. Kurmasana
 Initial position: ardha kurmasana (series 1)
Gradually, while moving the palms to the sides, bring the shoulders and shoulder blades under the knees. The torso and the nape with the crown continue to stretch forwards and down. Push the heels forward, bringing them a little to the sides, and turning the toes upwards. The distance between the heels is about 50-70 cm. While keeping the legs slightly bent at the knees, relax the muscles of the back and the lower leg surfaces, as well as the gluteus muscles, pushing the torso and pelvis forwards and down, but holding the spine in a slightly stretched forward, correlating the straightening of the legs with your own feelings, and trying to avoid the increasing discomfort in the body. In the final position the shoulders should be pressed against the floor, the pelvis and the lower back should be reversed forward in the hip joints, the stomach and the rib cage are also pressed against the floor, the muscles of the back and the lower surfaces of the legs are relaxed.
Effect: the muscles of the legs and the torso are actively stretched; the muscles of the abdominal wall and the pelvis are working; the slouching in the cervical and the thoracic regions of the spine is eliminated; the pelvis joints are opened up.
12. Padmasana
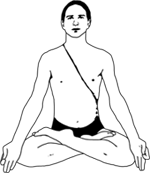 Initial position: sitting down with straight back and legs.
Move your straight legs to the sides, to approximately a 45-degree angle. While trying not to slouch, bend the straight back and pelvis slightly forward, reversing it in the pelvis joints against the straight legs. Bend the left leg at the knee at an approximately a 90-degree angle and relax the hips so that the knee of the bent leg ends up lowered in a relaxed state onto the floor. In other words, the important point of learning the padmasana is that the reversed position of the hips is achieved by means of relaxing the muscles around the hip joints. You should avoid any painful feelings in the knee, and especially avoid trying to lower the knee onto the floor while pushing it down with your hands – it may lead to injuries. The pelvis is kept on the floor. Thus, at the beginning of mastering the asana, you may take turns at bending the legs at the knees to a straight angle and relaxing the hips till bringing them down to the floor, while keeping the back and the pelvis in the vertical position. Once the previous variation has been mastered, pull (without lifting it off the floor) the left foot towards the crotch until the leg is bent at the knee, and then, while continuing to relax the hip, lift the heel, pull it up towards the navel, beforehand moving the hip to a maximum left and turning it outwards. Then lower the foot with the sole facing up into the bend, formed by the hip of the straight leg and the pelvis. The toe of the bent leg is placed slightly outside the hip area. Make sure the sensations in the knees and ankle joints are comfortable. While pushing the pelvis forward and straightening the back, allow the knee to come down to the floor in a relaxed way. If experiencing discomfort, stick to that variant of performing the asana, in which the pain is felt to a minimum. Stay in padmasana for several breaths, relaxing the hips, shoulders, face and breathing; then perform the symmetrical variation of the same set.
Effect: this is not a meditative asana; by means of crossing the legs over it contributes to the concentration of prana in kanda, as well as in the upper part of the body.