News
-
 Pranayama workshop, Mar 1-7
-
 21-day Pranayama challenge
-
 Nāda meditation workshop, January 8-12
-
 April 3, Navaratri with Yogi Matsyendranath Maharaj, Australia, Queensland
-
 March 17, 2020. Purifiying Pranayama With Yogi Matsyendra Nath
-
 November 2019, Tantra Workshop Series in Argentina
-
 Workshop in Gualeguaychu
-
") 17-18 November 2018, Yogi Matsyendranath in Źarate (Argentina)
17-18 November 2018, Yogi Matsyendranath in Źarate (Argentina)
-
 15-16 November 2018, Yogi Matsyendranath visit to Uruguay
-
") 12 Nov 2018, Lecture at USAL (Salvador University)
12 Nov 2018, Lecture at USAL (Salvador University)
-
") 10-11 November 2018, Workshops in Quilmes and La Plata (Argentina)
10-11 November 2018, Workshops in Quilmes and La Plata (Argentina)
-
") 8 November 2018, Open conference in Necochea (Argentina)
8 November 2018, Open conference in Necochea (Argentina)
-
 2,3,4 November 2018 - Participating in XVI Retreat International of Yoga and Meditation
-
 13-16 June") Programme in Québec (Canada) 13-16 June
Programme in Québec (Canada) 13-16 June
-
 Melbourne Book Launch
-
 4-years Summer Program
-
 Biography of a Russian Yogi
-
 November 2017, Visit of Yogi Matsyendranath to Argentina
-
 Satsangs of Yogi Matsyendranatha Maharaj in Berlin
-
") Seminars and trainings in June-July 2015 (France)
Seminars and trainings in June-July 2015 (France)
Asana set #2
1. Utthita Vayu Muktyasana
 Initial position: standing tall; back is straight;.
The body weight is evenly distributed through the soles. The chest is straightened; the face and shoulders are relaxed.Create slight tension along the spine upwards, from the pelvis to the nape. Patellas and muscles of the lower abdominal wall are slightly tightened. The coccyx should be slightly pulled down. The result is a slight turn of the pelvis in the hip joints that allows to slightly reduce the bent in the back, while the spine is straightening.Bend the left leg at the knee, lock the shank of the bent leg and pull the hip towards the body. Keep the sole of the pivot leg tightly on the floor. Straighten your back, keeping the tension along the spine. Stay in this position for 5-7 breaths. Switch sides and repeat.
Effect: this asana contributes to the improvement of balance, strengthens the ankles and ankle joints, and ensures development of deep hip muscles. While bending the legs, soft stretching of hip and lumbus muscles takes place.
2. Vriksasana
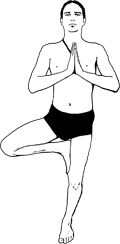 Initial position: the same as in the previous asana.
Bend the right leg at the knee and turn a hip to the side. A foot of the bent leg should be pressed to the hip as close to the crotch as possible. If the foot slides down, secure it with the same-side hand. The hands should be bent in the elbows with the palms folded against the chest. The supporting leg is straight, the knee cap is tightened and the hip muscles stay toned. The foot of the supporting leg faces forward; try not to turn it to the side. Then repeat the same in the opposite direction.
Effect: asana develops the sense of balance, strengthens the muscles of the supporting leg, opens the hip joint of the bent leg, and eliminates stiffness in the shoulder joints. In case of regular practice of this asana the neuromuscular coordination is improved. This asana is recommended as one of the means for regulating the vestibular apparatus functions and stabilisation of the nervous system.
3. Parsva Natarajasana
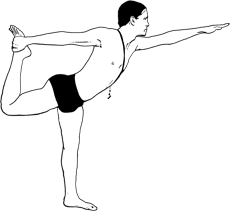 Initial position: the same as in the previous asana.
Bend the right leg at the knee, hold the ankle with your right hand and straighten the other hand, stretching the palm forward. The right shoulder is slightly pulled back; the fingertips of the stretched forward palm are tightly pressed together. Your eyes should be fixed on any point on the floor in front of you or at eye level. Gradually, while relaxing the face muscles and breath, pull the pelvis forward and incline the body forward, simultaneously straightening the bent leg gently at the knee. Balancing in this position, continue fixing your attention on the chosen point while regulating breathing and achieving inner relaxation. The pelvis stays in closed position. Return to the initial position. the same in the opposite direction.
Effect: opens the shoulders and chest, stretches out the hip muscles, muscles of the abdominal wall, exercises feet and ankles, shin muscles, balances the nervous system and facilitates the development of coordination and inner stability. It improves blood circulation in the pelvic organs and works out the muscles of the diaphragm and pelvis.
4. Virabhadrasana II
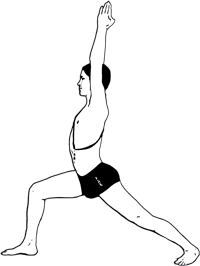 Initial position: feet are wide apart; toes are parallel to each other.
While exhaling turn both toes to the left; the left one should be turned at 90 degrees and the right one should be turned at 30-45 degrees; close the pelvis, turning it into a position that is perpendicular to the straight legs. Bend your left knee until the left hip is parallel to the floor and the shin - perpendicular to the floor in the way that the 90-degree angle is formed between the hip and the shin. The bent knee should be positioned on the same vertical line as the heel. When inhaling, stretch the palms of straight hands, the top of the head and the spine, distributing tension along all this line (if possible). In the final position keep the body and hands at such level of stretching that allows more or less regular breathing. The breathing becomes more regular with time. Face and eyes should be relaxed. The knee cap of the straight leg should be tucked up, the leg stays straight and the foot of the straight leg stays on the floor, pushing the body frontwards. Stay in this position for a few breaths, then straighten the leg and lower your hands while exhaling and return your body, pelvis and toes to the initial position. Repeat the same in the opposite direction.
Effect: this asana opens the chest and eliminates slouching in the cervical spine and thoracic section. The front surface of the hips is stretched, coxofemoral and ankle joints are worked out and the calf muscles are also stretched.
5. Parighasana
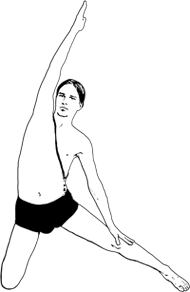 Initial position: kneeling.
Bring the left foot to the left, straightening it at the knee. Keeping the foot firmly on the floor, put it parallel to the shin of the bent leg; the shin of the bent leg and the toe of the straight one are directed forward-. If it is hard to keep the straight leg with the toe directed frontwards, you can move the toe a bit to the side.
Raise the right hand while enhaling, turning the palm to the left. Feeling tension along the right half of the body, slightly incline the body to the left, simultaneously exhaling and extending your hand upwards. Slight tension in the lateral muscles is felt while doing this asana; ease the tension against the background of a peaceful inner state.
Stay in this position for 1-2 breaths, return the body into a vertical position, while inhaling and keeping the hand straight. Then exhale and bring the palm down. Repeat the same in the opposite direction.
Effect: the lateral surface of the body, shoulder, straightened hand’s blade and the inside surface of the straight leg’s hip are stretched softly. This helps to practice the inclines and opens the chest.
6. Ashwa Sanchalanasana (light version)
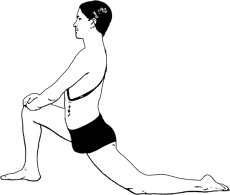 Initial position: kneeling.
Bring the left foot forward. Put it firmly on the floor; bend the straight leg at the knee while exhaling. Put the palms of straight hands on top of the knee; keep your back straight stretching the top of your head and spine upwards, and not throwing your head back. Pull the hip of the supporting knee forward simultaneously relaxing the tension surface. Also relax the hip of the bent. During the inhalation straighten the bent leg and then return it back it to the initial position. Repeat the same in the opposite direction.
Effect: the muscles of the hips are stretched, hip joints are opening and ankle joint is worked out.
7. Rotation of the shoulder girdle in Prasarita Padottanasana
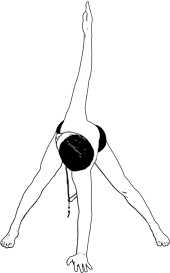 Initial position: standing, feet are wide apart, toes are parallel to each other.
When exhaling, lower your body and keep your palm of the straight right hand on the floor, in the middle of an imaginary line drawn between your feet. The palm should be placed under the shoulder. When inhaling, straighten the second palm vertically upwards in the way that this stretching hands up and down forms (with practice) a vertical line. Look up, focus on the straightened palm and turn your neck around its axis. The head should not hang down, the neck line should continue the line of a spine. Legs stay straight.
At first, perhaps, the line formed by hands may not be completely straight; do the asana as it goes. While mastering asana, create this line focusing on the feeling of comfort during the exercise. Stay in this position for several breaths. When exhaling, bring the palm down. Slowly raise your body when inhaling. Relax the shoulders when exhaling.
Effect: shoulder girdle opens, soft rotation of the spine occurs, the muscles along the spine, as well as oblique abdominal muscle, are worked out; the neck is also trained. The inner surfaces of hips are slightly stretched.
8. Hamsasana
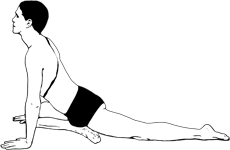 Initial position: as in Marjariasana, palms and knees are pushed against the floor; the body is in horizontal position. The left knee and shin slide forward on the floor. Straighten the right leg while relaxing the lower surface of its hip. The heel of the bent leg should be placed under the perineum; the pelvis should be lowered to the heel, gradually relaxing the shin of the bent leg. The palms of straight hands are placed on both sides of the bent leg’s knee, firmly touching the entire surface of the floor, from fingertips to wrists. While inhaling, stretch upwards the top of your head, the back of your head, and the entire surface of the back along the spine until you feel an even tension along it. Chin remains at the same level, the head is not thrown back and the sight is directed forward. At the same time, the shoulder blades are dropped ; the palms of the straightened hands are pushing against the floor. As a result, the spinemoves upwards, while shoulders and shoulder blades are move down. This allows creating high-quality stretching ofthe neck back out of the shoulders, releasing tension in the neck with minimum effort (with proper supervision over the attention and feelings).

Then do hamsasana at a moment when you exhale (b); while lowering the body, palms and elbows lay relaxed in front of you; relax the muscles along the spine and legs; with each exhalation the body flows down relaxed under its own weight. When inhaling, raise the body, changing the position of your legs; repeat the same in the opposite direction.
Effect: the spine is stretched evenly, hip muscles are worked out and the ankle joints are loosened up.
9. Ardha Navasana
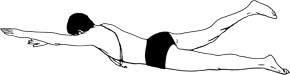
Initial position: lying on abdomen, palms are stretched forward, toes are put together and legs are straight.
While inhaling, raise the right palm and left hip from the floor, simultaneously extending the palm of the straight arm and shoulder blade frontwards, at the same time pulling the toe, hip and lumbus pulling backwards. Supporting hand and leg should remain relaxed lying on the floor. Back of the head is pulled forward together with the shoulder and blade, while looking down and not throwing back the head. Remain in the final position for a few breathing cycles, then return the hand and the leg to the initial position, lower your head and relax. Do the same in the opposite direction. While doing this asana breathing should remain even when possible and the face should be relaxed. Create a feeling of uniform tension along the spine with minimum (where possible) tension of the back muscles; the uniform tension distribution is more significant.
Effect: the emphasis here is on the working out the muscles along the spine, which strengthens it across the whole surface, as well as on working out hip and shoulder muscles; abdominal organs are massaged. Endurance and posture are formed, slouching is eliminated.
10. Parsva Janu Sirsasana
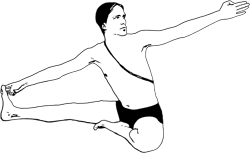
Initial position: Dandasana sitting with a straight back and legs.
Bend the left leg at the knee; pull the heel of the bent leg to the crotch. Take the first finger of the right leg with the right hand; the straight left hand should be pulled back forming a straight line between the palms and turning the body to the left. Slightly incline the body to the right, towards the straight leg, until you feel a slight tension on the left side of the body.
Feel the tension in the body and hands, slightly relax it from the inside, keeping the line formed between the hands and the incline. The head and the neck are turned to the left, chin looks in the direction of the palm that is straightened backwards. Also relax the hip of the bent leg. Make sure that the leg is bent at the knee to the maximum extent possible in order to avoid injury of the bent leg’s knee. Stay in the extreme position for a few breaths. Relax the face, eyes and breathing. Do the same in the opposite direction.
Effect: The lateral surface of the body is stretched; chest and shoulder girdle is expanded; neck is loosened up. The lower surface of the straight leg is stretched.
11. Ardha paschimottanasana
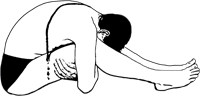 Initial position: Dandasana a pose with a straight back and legs.
Slightly bend your knees, incline the body and pelvis forward, embrace hips under the knees with your hands; put the forehead on the shins (in case you are able to do this). Relax the muscles of the back and hips. You can keep the muscles of the lower body in the slight tone: muscles of the neck’s lower part, chest muscles and muscles of the abdominal wall. Face and breath are relaxed. Exercise this for several breathing cycles. Return to the initial position when you inhale.
Effect: back muscles and lower surface of both legs are stretched, organs of the abdominal cavity are massaged. The nervous system is calmed.
12. Sukhasana
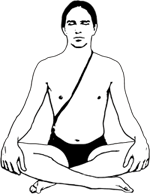 Initial position: sitting with a straight back and legs, looking in front of you, without lowering or throwing back your head. The chin is slightly pulled down, without lowering it to the chest.
Bend your legs at the knees, crossing the shins; straighten the spine and, keeping it in light tension, simultaneously relax the shoulders, face and breath. Palms are facing down, elbows are relaxed. Stay in this position for a while and then you can do shavasana and fully relax.
Effect: this asana balances energy and mind. It is preliminary and should be done before mastering such asanas, as siddhasana and padmasana.